Steeking Adventures - Pinion Cardigan from Twist Collective
I really love knitting Twist Collective patterns designed by Christa Giles. Why? First, every piece never fails to teach me a new technique, despite my experience. Second, her attention to finishing details is exquisite, especially how she deals with collars and edgings.
And now I must admit, as she is sure to read this (hi, Christa!) that I second-guess her instructions all the time. Naaaah, I don't need to cast-on this many stitches... nooooo why would I change needle size here?! Every time I end up ripping back and realizing that she was right.
One of the lessons I learned here was that casting-on twice as many stitches for a garter band and then decreasing them on the next row really helps it drape right.
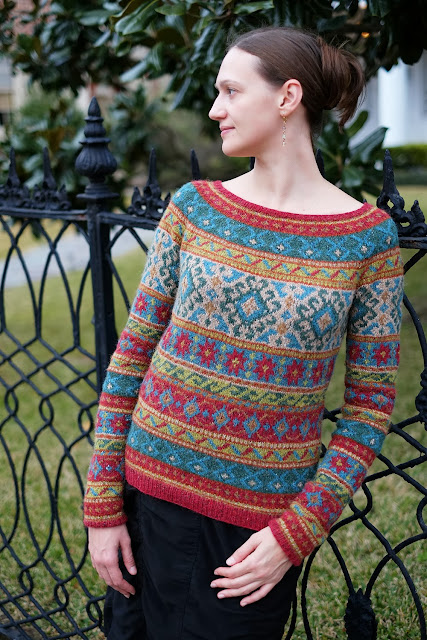
My recently finished cardigan, I am embarrassed to say, was started over a year ago! This is Pinion from Twist Collective Winter 2012, made with sport weight yarn.
I loved the feather yoke, and spent a lot of time deciding what my contrast color for the feathers would be. I decided stash-busting was in order and went to my old standby Kidsilk Aura scraps from my Sofia Wrap.
I actually did the entire yoke twice... be warned that it is very important that you meet gauge there, as stranding is always tighter than you might think. I had to go up 2 needles sizes to make it work. I also picked a larger than usual size (38 1/4" instead of 35" bust).
I think the yoke fits beautifully along the chest and sleeves, wow.
This changing of sizes is the culprit for why this cardigan took so damn long. The yoke/bust was great, but the lower body and sleeves were too wide.
Instead of really calculating what I needed, I was lazy and just kept re-doing it until it worked. Not a fun way to do this. Not a good way to finish your project. People, do your calculations!
This cardigan is 'steeked'. This basically means that you cut through your knitting to make the opening. Sounds a bit like sweater murder, I know. Sure, you could knit this cardigan flat, but the stranded yoke and knitting in general are much easier in the round... so you need to cut your knitting.
This was my second time steeking. The first time I did a machine stitch to secure the stitches inside of where I would cut. But these days my machine is only working in reverse. (is that not ridiculous, by the way?)
So, I went to a source that is often cited for steeks, Kate Davies, and decided on using her crochet technique. Because most of the steek is not stranded, I used I bright contrast thread to mark the center column to help with where to crochet.
By the way, be loose with your crochet, but not too loose so it isn't bumpy. Channel Goldilocks, my friend.
I sewed the hems down the side with slip stitch. It looks like I pulled out some cut fibers here and there, but the hem is wide enough that it will hold together.
This piece uses beautifully tailored edging, with very specific instructions on what parts to do when. The ribbing at the bottom meets seamlessly with the button band and the collar. Very neat, something I want to do again and again in the future.
Do overlook the loose waistband, I didn't listen to the designer's instructions and have to pay the price. Do as she says. And now you know why I call this my oPinionated cardigan!
As usual, I have some more opinions on how to deal with this, and will update. (No, it is impossible to rip out, as it is done before the button band.)
Now, let's talk a little bit about the collar. It's simply too high. And in alpaca, it is too itchy. I noticed this on the Twist Collective model, too.
There are a couple of reasons for this. One, to have such nice long feathers, you need a long yoke. But no one likes a yoke that doesn't properly meet the underarm. So, the length has to be on top.
Also, since I used US 6 needles for the yoke (instead of the recommended US4), it was even longer. As I said, the fit of the yoke is perfect at the underarms, so all my length went to my neck.
I tried a fix by sewing down a triangle on each corner...
...and then doing a single crochet row in the contrast color. Not bad. It's not really sitting right with the ribbing, as the two stitches have utterly different elasticities, but I'll accept the hugely added comfort level.
No more being stabbed by a corner every time I moved my head!
The color and lower stems are added after knitting. The embroidery is quite easy and fun. But because it is a running slip stitch, it can move around and loosen up in loops. Make sure everything is smooth before weaving in your ends.
I used little plastic buttons with starburst flowers, cute. They are the recommended width of the pattern, but I find they slide too easily through the holes. I suggest you go bigger. Or maybe it's the slippery alpaca at fault.
The yarn I used was swiped from the leftovers of another yoke project I completed years ago. This is from a Vogue Knitting pattern from Fall 2008 called Nordic Tradition (by Svetlana Avrakh).
I changed the yoke pattern a wee bit by adding extra crosses. I was trying to minimize the "burial mound" motif. Lol, am I right? It's totally a burial mound:
As a footnote, you'll notice I unknowingly used the same earrings in my oPinionated photo shoot!
This yarn is 100% alpaca from Indiecita, that I got in Santiago, Chile. It turned out to be extremely difficult to find there. I know. Right next to Peru. Do you know there is actually a yarn district in Santiago? And it is devoted to acrylic?? Anyway, finally, a shopwoman looked at me quizzically but then opened a bottom drawer with bags of the stuff. She didn't even want me to touch it!
Well. Imagine my annoyance when the next yarn shop I went to in the US had the same yarn! And yes you guessed it... for CHEAPER! Notice my labels are totally in english.
Alrighty, back to Pinion, then. As you can see, my sleeves are too long.
This is in part due to my weakness for long sleeves, in part due to 100% alpaca stretching after soaking. They will continue to get longer. But, while working, I realized they were really comfy folded up as cuffs!
So, I am going to re-do the edging so that the right side shows in a folded cuff. Really, I will. But.... not today. Or tomorrow. :) I want to wear this thing!
Oh and one other thing, guess what B. said when he came home and saw me wearing it... "You're my pretty squaw!" Aw!
I think the yoke fits beautifully along the chest and sleeves, wow.
This changing of sizes is the culprit for why this cardigan took so damn long. The yoke/bust was great, but the lower body and sleeves were too wide.
Instead of really calculating what I needed, I was lazy and just kept re-doing it until it worked. Not a fun way to do this. Not a good way to finish your project. People, do your calculations!
This cardigan is 'steeked'. This basically means that you cut through your knitting to make the opening. Sounds a bit like sweater murder, I know. Sure, you could knit this cardigan flat, but the stranded yoke and knitting in general are much easier in the round... so you need to cut your knitting.
This was my second time steeking. The first time I did a machine stitch to secure the stitches inside of where I would cut. But these days my machine is only working in reverse. (is that not ridiculous, by the way?)
So, I went to a source that is often cited for steeks, Kate Davies, and decided on using her crochet technique. Because most of the steek is not stranded, I used I bright contrast thread to mark the center column to help with where to crochet.
By the way, be loose with your crochet, but not too loose so it isn't bumpy. Channel Goldilocks, my friend.
Then, cut!
I sewed the hems down the side with slip stitch. It looks like I pulled out some cut fibers here and there, but the hem is wide enough that it will hold together.
This piece uses beautifully tailored edging, with very specific instructions on what parts to do when. The ribbing at the bottom meets seamlessly with the button band and the collar. Very neat, something I want to do again and again in the future.
Do overlook the loose waistband, I didn't listen to the designer's instructions and have to pay the price. Do as she says. And now you know why I call this my oPinionated cardigan!
As usual, I have some more opinions on how to deal with this, and will update. (No, it is impossible to rip out, as it is done before the button band.)
Now, let's talk a little bit about the collar. It's simply too high. And in alpaca, it is too itchy. I noticed this on the Twist Collective model, too.
There are a couple of reasons for this. One, to have such nice long feathers, you need a long yoke. But no one likes a yoke that doesn't properly meet the underarm. So, the length has to be on top.
Also, since I used US 6 needles for the yoke (instead of the recommended US4), it was even longer. As I said, the fit of the yoke is perfect at the underarms, so all my length went to my neck.
I tried a fix by sewing down a triangle on each corner...
 |
| I made it deeper, this is the first try. |
No more being stabbed by a corner every time I moved my head!
The color and lower stems are added after knitting. The embroidery is quite easy and fun. But because it is a running slip stitch, it can move around and loosen up in loops. Make sure everything is smooth before weaving in your ends.
Oops.
I used little plastic buttons with starburst flowers, cute. They are the recommended width of the pattern, but I find they slide too easily through the holes. I suggest you go bigger. Or maybe it's the slippery alpaca at fault.
The yarn I used was swiped from the leftovers of another yoke project I completed years ago. This is from a Vogue Knitting pattern from Fall 2008 called Nordic Tradition (by Svetlana Avrakh).
I changed the yoke pattern a wee bit by adding extra crosses. I was trying to minimize the "burial mound" motif. Lol, am I right? It's totally a burial mound:
As a footnote, you'll notice I unknowingly used the same earrings in my oPinionated photo shoot!
This yarn is 100% alpaca from Indiecita, that I got in Santiago, Chile. It turned out to be extremely difficult to find there. I know. Right next to Peru. Do you know there is actually a yarn district in Santiago? And it is devoted to acrylic?? Anyway, finally, a shopwoman looked at me quizzically but then opened a bottom drawer with bags of the stuff. She didn't even want me to touch it!
Well. Imagine my annoyance when the next yarn shop I went to in the US had the same yarn! And yes you guessed it... for CHEAPER! Notice my labels are totally in english.
Alrighty, back to Pinion, then. As you can see, my sleeves are too long.
This is in part due to my weakness for long sleeves, in part due to 100% alpaca stretching after soaking. They will continue to get longer. But, while working, I realized they were really comfy folded up as cuffs!
So, I am going to re-do the edging so that the right side shows in a folded cuff. Really, I will. But.... not today. Or tomorrow. :) I want to wear this thing!
Oh and one other thing, guess what B. said when he came home and saw me wearing it... "You're my pretty squaw!" Aw!
My oPinionated cardigan on Ravelry





What a great detailed assessment of the pattern. I thought "squaw" as well when I saw the photos. I've never heard of steeking before and don't think I'd be brave enough, but I can see why it works.
ReplyDeleteThank you! I always try to give enough detail that others don't have the same pitfalls, ha! I am remembering now about my young life as part of a YMCA group called "Indian Guides" where fathers with sons or daughters would get together and learn and do things based on local Native American history. I think I was channeling that experience when I picked these colors!
DeleteLove your postings and the tips you give.
ReplyDeleteJust started following your blog, after seeing your work on Ravelry (trying to catch up on the plaid thread in the Anthro group.) I could favorite every single one of your projects. Wow! This oPinionated cardi is certainly fabulous, and inspiring.
ReplyDeleteI also want to mention that I have those same earrings! And they are my faves. I got them as part of a swap we did a while back in the Anthro group--in fact it was sort of a dud experience for me except for the earrings, as my swap partner didn't come through with the whole deal. . . but I love those earrings so much. Very fun to see them on someone else.
BTW, I am LCBraun on Ravelry. For a long time I was one of the moderators of the Anthro group, but my work has just been too intense to do that in the past few years and I am barely getting any knitting done either. But after this summer, it will again be more present in my life. Thanks for keeping up my inspiration in the meantime.
Thank you so much for visiting all my Rav work and blog! That plaid thread has been a real eye opener... I've always been itching to do some plaid knitting since I saw a tartan-y skirt in that Teva Durham book Loop-d-Loop. And how funny about the earrings! Now, because it was a swap, you won't know where they are from, right? Well, barring that they are probably made in China and distributed willy-nilly... I got them at Target! Yup, Target. For $4.99. And to think I almost didn't buy them because they seemed expensive. They are my husband's favorites, too!
DeleteSo funny about the Indiecita. My husband promised to bring home some nice yarn from his first trip to Chile, and that's exactly what he brought - 2 skeins each in 3 colors. It's Coats and Clark, isn't it? Still haven't done anything with it. Love the sweater - it reminds me of latte art.
ReplyDeleteYipes, this is seriously beautiful! I've seen it in your Ravatar and loved reading about it!
ReplyDeleteOoh, thanks for the compliment and thanks for reading!
Delete'Dances with Wool'.....that's what we'll call you from now on!Awesome work there, girlie. Great reading about your knitting adventures - your skill knows no bounds. Just wonderful. Oh, and Belated Birthday Greetings to you.x
ReplyDeleteOh, I love the name, how sweet! And thanks for the b-day greetings, it was a good one. I received a camera to take even MORE knitting photos!
Delete